Kivy は、NUI (Natural User Interface) を持つモバイルアプリやその他のマルチタッチアプリケーションソフトウェアを開発するためのフリーでオープンソースの Python フレームワークです。MIT ライセンスのもとで配布され、Android, iOS, Linux, macOS そして Windows で動作させることができます。
使ったことのなかった Python の GUI ライブラリ(フレームワーク)、Kivy に興味を持ったので [1]、ひととおりウィジェットのサンプルを作ってみようとしています。サンプルを作っていくにあたって、どんなスタイルでコーディングするか、テンプレートみたいなものを固めていこうとあれこれ試し始めました。
今回はフロートレイアウトのサンプルを紹介します。
Python のコードのみのサンプルと、UI 部分を分離して Kv 言語で記述した同じ動作をするサンプルを併せて紹介しています。
下記の環境で動作確認をしています。
![]() |
Fedora Linux 37 (Server Edition Prerelease) | x86_64 | ||
python3 | python3.10-3.10.7-1.fc37.x86_64 | |||
Kivy | 2.1.0 |
StackLayout (Python)
StackLayout は、レイアウト内(=親ウィジェットのサイズ)に収まる限り、縦方向または横方向に子ウィジェットを順番に並べて配置します。個々の子ウィジェットのサイズは、均一である必要はありません。
import japanize_kivy | |
from kivy.app import App | |
from kivy.core.window import Window | |
from kivy.uix.button import Button | |
from kivy.uix.stacklayout import StackLayout | |
Window.size = (200, 200) | |
class KivyStackLayout(StackLayout): | |
def __init__(self): | |
super().__init__() | |
self.orientation = 'lr-tb' | |
# self.orientation = 'rl-bt' | |
# self.orientation = 'tb-lr' | |
self.init_ui() | |
def init_ui(self): | |
for i in range(10): | |
btn = Button(text=chr(i + 65), width=(i + 1) * 10, size_hint=(None, 0.2)) | |
btn.bind(on_press=self.on_button_pressed) | |
self.add_widget(btn) | |
def on_button_pressed(self, instance): | |
print('ボタン %s がクリックされました。' % instance.text) | |
class ExampleApp(App): | |
def build(self): | |
self.title = 'StackLayout' | |
return KivyStackLayout() | |
if __name__ == '__main__': | |
ExampleApp().run() |
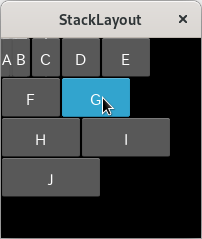
orientation で指定する子ウィジェットの並べ方は、'lr-tb', 'tb-lr', 'rl-tb', 'tb-rl', 'lr-bt', 'bt-lr', 'rl-bt' および 'bt-rl' のいずれかです。t は top、b は bottom、l は left、r は right を表します。
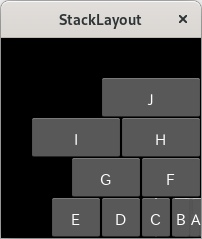
StackLayout (Python + Kv)
指定したファイルを読み込むようにしたかったので、ここでは Builder.load_file() を使って、指定したファイルを読み込むようにしています。
まずは、Kv のベタな記述です。
import japanize_kivy | |
from kivy.app import App | |
from kivy.core.window import Window | |
from kivy.lang import Builder | |
from kivy.uix.stacklayout import StackLayout | |
Builder.load_file('kivy_stacklayout_1.kv') | |
Window.size = (200, 200) | |
class KivyStackLayout(StackLayout): | |
def on_button_pressed(self, instance): | |
print('ボタン %s がクリックされました。' % instance.text) | |
class ExampleApp(App): | |
def build(self): | |
self.title = 'StackLayout' | |
return KivyStackLayout() | |
if __name__ == '__main__': | |
ExampleApp().run() |
<KivyStackLayout>: | |
orientation: 'lr-tb' | |
Button: | |
id: btn_a | |
text: "A" | |
width: 10 | |
size_hint:(None, 0.2) | |
on_press: root.on_button_pressed(self) | |
Button: | |
id: btn_b | |
text: "B" | |
width: 20 | |
size_hint:(None, 0.2) | |
on_press: root.on_button_pressed(self) | |
Button: | |
id: btn_c | |
text: "C" | |
width: 30 | |
size_hint:(None, 0.2) | |
on_press: root.on_button_pressed(self) | |
Button: | |
id: btn_d | |
text: "D" | |
width: 40 | |
size_hint:(None, 0.2) | |
on_press: root.on_button_pressed(self) | |
Button: | |
id: btn_e | |
text: "E" | |
width: 50 | |
size_hint:(None, 0.2) | |
on_press: root.on_button_pressed(self) | |
Button: | |
id: btn_f | |
text: "F" | |
width: 60 | |
size_hint:(None, 0.2) | |
on_press: root.on_button_pressed(self) | |
Button: | |
id: btn_g | |
text: "G" | |
width: 70 | |
size_hint:(None, 0.2) | |
on_press: root.on_button_pressed(self) | |
Button: | |
id: btn_h | |
text: "H" | |
width: 80 | |
size_hint:(None, 0.2) | |
on_press: root.on_button_pressed(self) | |
Button: | |
id: btn_i | |
text: "I" | |
width: 90 | |
size_hint:(None, 0.2) | |
on_press: root.on_button_pressed(self) | |
Button: | |
id: btn_j | |
text: "J" | |
width: 100 | |
size_hint:(None, 0.2) | |
on_press: root.on_button_pressed(self) | |
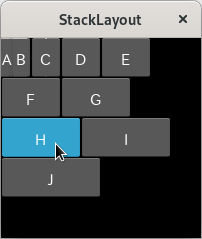
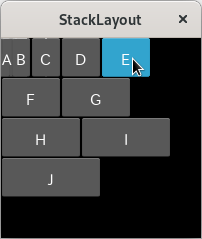
on_kv_post イベントで(Python 側に)ディスパッチしてループを実行した例です。ループの一行は長いので、可能な個所で改行していますが、インデントを加えられないので却って読みにくいかもしれません。また、ループの内容は Python ですので、わざわざ Kv で記述する必要はないのかもしれません。
import japanize_kivy | |
from kivy.app import App | |
from kivy.core.window import Window | |
from kivy.lang import Builder | |
from kivy.uix.stacklayout import StackLayout | |
Builder.load_file('kivy_stacklayout_2.kv') | |
Window.size = (200, 200) | |
class KivyStackLayout(StackLayout): | |
def on_button_pressed(self, instance): | |
print('ボタン %s がクリックされました。' % instance.text) | |
class ExampleApp(App): | |
def build(self): | |
self.title = 'StackLayout' | |
return KivyStackLayout() | |
if __name__ == '__main__': | |
ExampleApp().run() |
#: import Button kivy.uix.button.Button | |
<KivyStackLayout>: | |
orientation: 'lr-tb' | |
on_kv_post: | |
[self.add_widget( | |
Button( | |
text=chr(i + 65), | |
width=(i + 1) * 10, | |
size_hint=(None, 0.2), | |
on_press=self.on_button_pressed | |
) | |
) | |
for i in range(10)] |
参考サイト
- bitWalk's: Kivy をちょろっと使ってみた [2022-07-10]
- Kv language — Kivy 2.1.0 documentation
- Kivy Language — Kivy 2.1.0 documentation
- Widgets — Kivy 2.1.0 documentation
- Stack Layout — Kivy 2.1.0 documentation

にほんブログ村
#オープンソース

0 件のコメント:
コメントを投稿