ラベル SWT の投稿を表示しています。 すべての投稿を表示

2014-11-06

Eclipse で Commons Math を試す (2)

Cmmons Math を利用した、前回の記事で紹介したサンプルをベースに、データや重回帰分析でフィッティングした多項式をプロットできるようにしました。使用したライブラリは Nebula Visualization Widgets の XY Graph です。

GUI の部分を無理矢理くっつけた、やっつけ感が満載のサンプルではありますが、期待どおりのプロットを表示してくれます。読み込む 100,000 組の xy が対になっているデータは、前回と同様、fdata01.zip (fdata01.txt) を使います。

List: MulRegGuiTest.java
package commonsmathtest;

import java.io.BufferedReader;
import java.io.File;
import java.io.FileNotFoundException;
import java.io.FileReader;
import java.io.IOException;

import org.apache.commons.math3.stat.regression.OLSMultipleLinearRegression;
import org.eclipse.draw2d.LightweightSystem;
import org.eclipse.nebula.visualization.xygraph.dataprovider.CircularBufferDataProvider;
import org.eclipse.nebula.visualization.xygraph.figures.Trace;
import org.eclipse.nebula.visualization.xygraph.figures.Trace.TraceType;
import org.eclipse.nebula.visualization.xygraph.figures.XYGraph;
import org.eclipse.nebula.visualization.xygraph.figures.Trace.PointStyle;
import org.eclipse.nebula.visualization.xygraph.util.XYGraphMediaFactory;
import org.eclipse.swt.layout.FillLayout;
import org.eclipse.swt.widgets.Display;
import org.eclipse.swt.widgets.Shell;

public class MulRegGuiTest {
    Shell shell;

    private File file;
    private int m = 100000, n = 5;
    private double[][] X;
    private double[] y;
    private double[] c;
    
    public MulRegGuiTest(Display display, File file) {
        this.file = file;

        // multiple regression analysis
        calcMulReg();

        // GUI
        shell = new Shell(display);
        shell.setText("MulRegGuiTest");
        shell.setSize(800, 400);

        shell.setLayout(new FillLayout());

        initUI();

        shell.setLocation(100, 100);
        shell.open();

        // event loop
        while (!shell.isDisposed()) {
            if (!display.readAndDispatch()) {
                display.sleep();
            }
        }
    }

    private void calcMulReg() {
        X = new double[m][n];
        y = new double[m];

        try (BufferedReader br = new BufferedReader(new FileReader(file))) {
            String str;
            int i = 0;

            while ((str = br.readLine()) != null) {
                double xValue = Double.parseDouble(str.substring(0, 6));
                y[i] = Double.parseDouble(str.substring(6, 20));
                for (int j = 0; j < n; j++) {
                    X[i][j] = Math.pow(xValue, (double) j);
                }
                i++;
            }
            br.close();
        } catch (FileNotFoundException e) {
            System.out.println(e);
        } catch (IOException e) {
            System.out.println(e);
        }

        OLSMultipleLinearRegression regression = new OLSMultipleLinearRegression();
        regression.setNoIntercept(true);
        regression.newSampleData(y, X);

        c = regression.estimateRegressionParameters();
        // double[] residuals = regression.estimateResiduals();
        // double[][] parametersVariance = regression.estimateRegressionParametersVariance();
        // double regressandVariance = regression.estimateRegressandVariance();
        double rSquared = regression.calculateRSquared();
        // double sigma = regression.estimateRegressionStandardError();

        // Result
        System.out.println("# of DATA\t" + m);
        System.out.println("Coefficients");
        for (int j = 0; j < n; j++) {
            System.out.println("C(" + j + ") =  " + c[j]);
        }
        System.out.println("R-squared = " + rSquared);
    }

    private void initUI() {
        // use LightweightSystem to create the bridge between SWT and draw2D
        LightweightSystem lws = new LightweightSystem(shell);

        // create a new XY Graph.
        XYGraph xyGraph = new XYGraph();
        xyGraph.setTitle("Mulreg Example");

        xyGraph.primaryXAxis.setTitle("x axis");
        xyGraph.primaryYAxis.setTitle("y axis");

        xyGraph.primaryXAxis.setShowMajorGrid(true);
        xyGraph.primaryYAxis.setShowMajorGrid(true);

        // set it as the content of LightwightSystem
        lws.setContents(xyGraph);

        xyGraph.primaryXAxis.setAutoScale(true);
        xyGraph.primaryYAxis.setAutoScale(true);

        // create a trace data provider, which will provide the data to the trace.
        CircularBufferDataProvider traceDataProvider1 = new CircularBufferDataProvider(false);
        CircularBufferDataProvider traceDataProvider2 = new CircularBufferDataProvider(false);
        traceDataProvider1.setBufferSize(m);
        traceDataProvider2.setBufferSize(m);

        for (int i = 0; i < m; i++) {
            traceDataProvider1.setCurrentXData(X[i][1]);
            traceDataProvider1.setCurrentYData(y[i]);

            traceDataProvider2.setCurrentXData(X[i][1]);
            traceDataProvider2.setCurrentYData(linearCoupling(i));
        }

        // create the trace for raw data
        Trace trace1 = new Trace("data", xyGraph.primaryXAxis, xyGraph.primaryYAxis, traceDataProvider1);

        // set trace property for raw data
        trace1.setTraceType(TraceType.POINT);
        trace1.setPointStyle(PointStyle.CIRCLE);
        trace1.setPointSize(1);

        // add the trace to xyGraph
        xyGraph.addTrace(trace1);

        // create the trace for regression
        Trace trace2 = new Trace("fitting", xyGraph.primaryXAxis, xyGraph.primaryYAxis, traceDataProvider2);

        // set trace property for regression
        trace2.setPointStyle(PointStyle.NONE);
        trace2.setTraceColor(XYGraphMediaFactory.getInstance().getColor(XYGraphMediaFactory.COLOR_RED));;
        trace2.setLineWidth(2);

        // add the trace to xyGraph
        xyGraph.addTrace(trace2);
    }

    private double linearCoupling(int i) {
        double y = 0;
        for (int j = 0; j < n; j++) {
            y = y + c[j] * X[i][j];
        }
        return y;
    }

    public static void main(String[] args) {
        File readFile = new File("/home/bitwalk/ドキュメント/fdata01.txt");

        Display display = new Display();
        new MulRegGuiTest(display, readFile);
        display.dispose();
    }
}

実行例

重回帰分析をするために用意したサンプルは人為的に作ったものですので、プロットしても面白味がありません。しかし、100,000 程度のデータ数でも簡単にプロットできることが確認できたので、もっと応用範囲を広げてみようと思います。


2014-11-01

複数行の文字列表示と StyledText

SWT の Text を、複数行にわたる文字列を表示するだけの用途に使おうとして、サンプルを作って確認をしました。以下のように Text の編集機能を無効にすればなんとかなると簡単に考えていたのすが…、ひとつ問題がありました。

List: SWTAppText.java
package text;

import org.eclipse.swt.SWT;
import org.eclipse.swt.layout.GridData;
import org.eclipse.swt.layout.GridLayout;
import org.eclipse.swt.widgets.Display;
import org.eclipse.swt.widgets.Shell;
import org.eclipse.swt.widgets.Text;

public class SWTAppText {
    Shell shell;

    public SWTAppText(Display display) {
        shell = new Shell(display);
        shell.setText("メッセージ");

        initUI();

        shell.setSize(200, 100);
        shell.open();

        while (!shell.isDisposed()) {
            if (!display.readAndDispatch()) {
                display.sleep();
            }
        }

    }

    public void initUI() {
        shell.setLayout(new GridLayout(1, true));

        Text text = new Text(shell, SWT.MULTI | SWT.WRAP | SWT.READ_ONLY);
        text.setText("複数行の文字列を Text に表示するためだけのサンプルです。");
        text.setEditable(false); // READ_ONLY だけで十分かもしれないが、念の為
        
        GridData gd = new GridData();
        gd.horizontalAlignment = GridData.FILL;
        gd.verticalAlignment = GridData.FILL;
        gd.grabExcessHorizontalSpace = true;
        gd.grabExcessVerticalSpace = true;
        text.setLayoutData(gd);

    }

    public static void main(String[] args) {
        Display display = new Display();
        new SWTAppText(display);
        display.dispose();
    }
}

実行例

上の実行例のように、複数行にわたる文字列を表示する用途には使えるのですが、文字列の先頭に必ず「入力カーソル (Input Cursor)」が表示されていて、これを消すことができません。解決方法をインターネットで探しているうちに気が付きました。そもそも、文字れの先頭に表示されている入力用のカーソルを「入力カーソル (Input Cursor)」であると信じ込んでいたことが、解決に時間がかかってしまったことをです。「キャレット (Caret)」をキーワードにして探せば簡単に StyledText を使えば良いことに気付いたことでしょう。

「入力カーソル (Input Cursor)」は Tcl/Tk で使われている用語です(例えば [2])。昔、Tcl/Tk を IME などの日本語入力へ対応させることに取り組んでいて、Caret = 「漢字キーなどを押して(Caret の位置に)かな変換用ウィンドウを出すこと」にイメージが固まってしまっていて Caret というキーワードが出てきませんでした。

Text の代わりに StyledText を利用して Caret を非表示にしたサンプルを示します。

List: SWTAppStyledText.java
package styledtext;

import org.eclipse.swt.SWT;
import org.eclipse.swt.custom.StyledText;
import org.eclipse.swt.layout.GridData;
import org.eclipse.swt.layout.GridLayout;
import org.eclipse.swt.widgets.Display;
import org.eclipse.swt.widgets.Shell;

public class SWTAppStyledText {
    Shell shell;

    public SWTAppStyledText(Display display) {
        shell = new Shell(display);
        shell.setText("メッセージ");

        initUI();

        shell.setSize(200, 100);
        shell.open();

        while (!shell.isDisposed()) {
            if (!display.readAndDispatch()) {
                display.sleep();
            }
        }

    }

    public void initUI() {
        shell.setLayout(new GridLayout(1, true));

        StyledText text = new StyledText(shell, SWT.MULTI | SWT.WRAP | SWT.READ_ONLY);
        text.setText("複数行の文字列を StyledText に表示するためだけのサンプルです。");
        text.setEditable(false);
        text.setCaret(null); 
        
        GridData gd = new GridData();
        gd.horizontalAlignment = GridData.FILL;
        gd.verticalAlignment = GridData.FILL;
        gd.grabExcessHorizontalSpace = true;
        gd.grabExcessVerticalSpace = true;
        text.setLayoutData(gd);

    }

    public static void main(String[] args) {
        Display display = new Display();
        new SWTAppStyledText(display);
        display.dispose();
    }
}

実行例

複数行にわたる文字列を表示するだけのことですが、Caret というキーワードを使わなかったために意外に解決に手こずってしまったので、自戒を込めて備忘録的に書留ました。

参考サイト

  1. Eclipse Community Forums: Standard Widget Toolkit (SWT) » how to remove blinking cursor in StyledText widget
  2. The Tk Text Widget | Linux Journal

2014-10-25

ProgressIndicator と Thread

JFace の ProgressIndicator を利用して、ファイルの読み込みなど時間が掛かる処理について、単に処理中であることを表示しようとしましたが、最初、なかなかうまくいきませんでした。試行錯誤して、当初予定していたサンプルが出来たので、備忘録として書留ます。

このサンプルは、ダミーの処理をしているスレッドから、UI スレッドにある ProgressIndicator のインスタンス indicator に非同期でアクセスして操作をしています。なお、このサンプルでは [2] のように別スレッドの処理中に「処理開始」ボタンがクリックされることを考慮していません。

List: ProgressIndicatorTest.java
package jfacesample;

import org.eclipse.jface.dialogs.ProgressIndicator;
import org.eclipse.jface.window.ApplicationWindow;
import org.eclipse.swt.SWT;
import org.eclipse.swt.events.SelectionAdapter;
import org.eclipse.swt.events.SelectionEvent;
import org.eclipse.swt.layout.GridData;
import org.eclipse.swt.layout.GridLayout;
import org.eclipse.swt.widgets.Button;
import org.eclipse.swt.widgets.Composite;
import org.eclipse.swt.widgets.Control;
import org.eclipse.swt.widgets.Display;
import org.eclipse.swt.widgets.Shell;

public class ProgressIndicatorTest extends ApplicationWindow {
    Display display;
    ProgressIndicator indicator;

    public ProgressIndicatorTest() {
        super(null);
    }

    @Override
    protected Control createContents(Composite parent) {
        Shell shell = parent.getShell();
        display = shell.getDisplay();
        shell.setText("ProgressIndicatorTest");

        GridLayout layout = new GridLayout();
        parent.setLayout(layout);

        GridData gd;

        // start button
        Button start = new Button(parent, SWT.PUSH);
        start.setText("処理開始");
        gd = new GridData(GridData.FILL_HORIZONTAL);
        start.setLayoutData(gd);
        start.addSelectionListener(new SelectionAdapter() {
            @Override
            public void widgetSelected(SelectionEvent e) {
                startWork();
            }
        });

        // progress indicator
        indicator = new ProgressIndicator(parent);
        gd = new GridData(GridData.FILL_HORIZONTAL);
        indicator.setLayoutData(gd);

        return parent;
    }

    private void startWork() {
        DummyTask task = new DummyTask(display, indicator);
        Thread th = new Thread(task);
        th.start();
    }

    public static void main(String[] args) {
        ProgressIndicatorTest w = new ProgressIndicatorTest();
        w.setBlockOnOpen(true);
        w.open();
        Display.getCurrent().dispose();
    }
}

class DummyTask implements Runnable {
    Display display;
    ProgressIndicator indicator;

    DummyTask(Display display, ProgressIndicator indicator) {
        this.display = display;
        this.indicator = indicator;        
    }

    public void run() {
        // start progress indicator
        display.asyncExec(new Runnable() {
            public void run() {
                indicator.beginAnimatedTask();
                indicator.showNormal();
            }
        });

        // dummy task
        long sleepTime = 3000; // milliseconds
        long endTime = System.currentTimeMillis() + sleepTime;
        while (System.currentTimeMillis() < endTime) {
        }

        // stop progress indicator
        display.asyncExec(new Runnable() {
            public void run() {
                indicator.done();
            }
        });

        System.out.println("completed!");
    }
}

実行例

参考サイト

  1. IBM Knowledge Center
  2. 基礎編 - スレッド

2014-08-17

SWT による GUI プログラミング (7) - NatTable のサンプル (2)

NatTable をネットで見つけて、これを使えるようにするには時間を書ける必要があると見積もり、夏休みが始まるのを首を長くして待っていました。

NatTable を利用するには、まず SWT/JFace を理解しておく必要があると考え、休みの前半にはそこそこ理解できたと思えるようになりました。そこで、そろそろ NatTable に取り組めるだろうと判断し、サンプルプログラムを眺めながら内容の理解を始めました。

いろいろと迷いがでてきたのはこの頃です。迷走を繰り返し、結局、Java プログラミングに対する自分の取り組み方があまり良くないことに気が付きました。それは、

  • 機能を理解するための早道は単純な一つのファイルで記述することだ、という幻想を捨てるべき。
    • AWT や SWT の機能を確認するだけなら良いが、あまりこだわると、却って Java らしくないプログラミングを追求することになりかねない。
  • Eclipse を開発環境に使うのであれば、Eclipse RCP を利用すべし。
    • 手っ取り早く、プラグインのリソースを利用したアプリケーションを効果的に構築するのであれば、これを利用しない手はない。

今日は夏休みの最終日。残念ながら Eclipse RCP の理解はいまいちで、時間切れです。もう一週間休むことができれば…

以前勤めていた外資系の会社では(激務であるためか) 3 年毎に 4 週間の sabbatical leave が認められましたが、今の会社にはそのような制度はありません。本業はプログラマでないので、継続的に少しずつ時間を見つけて習得していくしかありません。

そういう訳で夏休みの取り組みの成果としては心許無いのですが、NatTable のサンプルをひとつ紹介します。

NatTable のサンプル

NatTable については、理解しているというレベルにはまだ程遠いです。NatTable のサンプルプログラム NatTableExamples.jar から興味があるものを抜き出して、自分が理解しやすいように手を加えてコードの中身を調べているような段階です。ここでは、サンプル _304_DynamicColumnExample.java を(要するに)パクったものを紹介するにとどめます。余分な機能は整理して削除してあります。

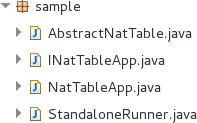
今回紹介するサンプルは右の 4 つになります。

最初は、サンプルの機能概要を記述したインターフェイスです。

List: ISampleApp.java
/*******************************************************************************
 * Copyright (c) 2012 Original authors and others.
 * All rights reserved. This program and the accompanying materials
 * are made available under the terms of the Eclipse Public License v1.0
 * which accompanies this distribution, and is available at
 * http://www.eclipse.org/legal/epl-v10.html
 * 
 * Contributors:
 *     Original authors and others - initial API and implementation
 ******************************************************************************/
// Original File is INatExample.java in NatTableExamples.jar
// modified by Suguri Fuhito, 15-Aug-2014
package sample;

import org.eclipse.swt.widgets.Composite;
import org.eclipse.swt.widgets.Control;

public interface ISampleApp {

    public String getName();
 
    public Control createNatTableControl(Composite parent);
 
    public void onStart();
 
    public void onStop();
 
}

次は、インターフェイス INatTableApp.java を実装した抽象クラスです。

List: AbstractSampleApp.java
/*******************************************************************************
 * Copyright (c) 2012 Original authors and others.
 * All rights reserved. This program and the accompanying materials
 * are made available under the terms of the Eclipse Public License v1.0
 * which accompanies this distribution, and is available at
 * http://www.eclipse.org/legal/epl-v10.html
 * 
 * Contributors:
 *     Original authors and others - initial API and implementation
 ******************************************************************************/
// Original File is AbstractNatExample.java in NatTableExamples.jar
// modified by Suguri Fuhito, 15-Aug-2014
package sample;

import org.eclipse.swt.widgets.Composite;
import org.eclipse.swt.widgets.Control;

public abstract class AbstractSampleApp implements ISampleApp {

    public String getName() {
        return getClass().getSimpleName().replaceAll("^_[0-9]*_", "")
                .replace('_', ' ');
    }

    public void onStart() {
    }

    public void onStop() {
    }

    public Control createNatTableControl(Composite parent) {
        return null;
    }
}

抽象クラス AbstractNatTable を継承/オーバーライドして、NatTable のインスタンスを生成するクラスです。

List: NatTableApp.java
// Original File is _304_DynamicColumnExample.java in NatTableExamples.jar
// modified by Suguri Fuhito, 15-Aug-2014

package sample;

import java.util.ArrayList;
import java.util.HashMap;
import java.util.List;
import java.util.Map;

import org.eclipse.jface.layout.GridDataFactory;
import org.eclipse.nebula.widgets.nattable.NatTable;
import org.eclipse.nebula.widgets.nattable.config.ConfigRegistry;
import org.eclipse.nebula.widgets.nattable.config.DefaultNatTableStyleConfiguration;
import org.eclipse.nebula.widgets.nattable.data.IColumnPropertyAccessor;
import org.eclipse.nebula.widgets.nattable.data.IDataProvider;
import org.eclipse.nebula.widgets.nattable.data.ListDataProvider;
import org.eclipse.nebula.widgets.nattable.grid.data.DefaultCornerDataProvider;
import org.eclipse.nebula.widgets.nattable.grid.data.DefaultRowHeaderDataProvider;
import org.eclipse.nebula.widgets.nattable.grid.layer.ColumnHeaderLayer;
import org.eclipse.nebula.widgets.nattable.grid.layer.CornerLayer;
import org.eclipse.nebula.widgets.nattable.grid.layer.DefaultRowHeaderDataLayer;
import org.eclipse.nebula.widgets.nattable.grid.layer.GridLayer;
import org.eclipse.nebula.widgets.nattable.grid.layer.RowHeaderLayer;
import org.eclipse.nebula.widgets.nattable.layer.DataLayer;
import org.eclipse.nebula.widgets.nattable.layer.ILayer;
import org.eclipse.nebula.widgets.nattable.layer.event.ColumnInsertEvent;
import org.eclipse.nebula.widgets.nattable.layer.stack.DefaultBodyLayerStack;
import org.eclipse.nebula.widgets.nattable.sort.config.SingleClickSortConfiguration;
import org.eclipse.nebula.widgets.nattable.ui.menu.HeaderMenuConfiguration;
import org.eclipse.swt.SWT;
import org.eclipse.swt.events.SelectionAdapter;
import org.eclipse.swt.events.SelectionEvent;
import org.eclipse.swt.layout.GridLayout;
import org.eclipse.swt.widgets.Button;
import org.eclipse.swt.widgets.Composite;
import org.eclipse.swt.widgets.Control;

public class NatTableApp extends AbstractSampleApp {

    private List<String> columns = new ArrayList<String>();
    private List<Map<String, String>> values = new ArrayList<Map<String, String>>();

    public static void main(String[] args) throws Exception {
        StandaloneRunner.run(600, 300, new NatTableApp());
    }

    @Override
    public Control createNatTableControl(Composite parent) {
        // start with 3 columns
        columns.add("Column_0");
        columns.add("Column_1");
        columns.add("Column_2");

        values.add(createValueRow("Homer"));
        values.add(createValueRow("Marge"));
        values.add(createValueRow("Bart"));
        values.add(createValueRow("Lisa"));
        values.add(createValueRow("Maggie"));

        Composite panel = new Composite(parent, SWT.NONE);
        panel.setLayout(new GridLayout());
        GridDataFactory.fillDefaults().grab(true, true).applyTo(panel);

        Composite gridPanel = new Composite(panel, SWT.NONE);
        gridPanel.setLayout(new GridLayout());
        GridDataFactory.fillDefaults().grab(true, true).applyTo(gridPanel);

        Composite buttonPanel = new Composite(panel, SWT.NONE);
        buttonPanel.setLayout(new GridLayout());
        GridDataFactory.fillDefaults().grab(true, true).applyTo(buttonPanel);

        ConfigRegistry configRegistry = new ConfigRegistry();

        // create the body layer stack
        IDataProvider bodyDataProvider = new ListDataProvider<Map<String, String>>(
                values, new MyColumnPropertyAccessor());
        final DataLayer bodyDataLayer = new DataLayer(bodyDataProvider);
        DefaultBodyLayerStack bodyLayerStack = new DefaultBodyLayerStack(
                bodyDataLayer);

        // create the column header layer stack
        IDataProvider columnHeaderDataProvider = new SimpleColumnHeaderDataProvider();
        ILayer columnHeaderLayer = new ColumnHeaderLayer(new DataLayer(
                columnHeaderDataProvider), bodyLayerStack.getViewportLayer(),
                bodyLayerStack.getSelectionLayer());

        // create the row header layer stack
        IDataProvider rowHeaderDataProvider = new DefaultRowHeaderDataProvider(
                bodyDataProvider);
        ILayer rowHeaderLayer = new RowHeaderLayer(
                new DefaultRowHeaderDataLayer(new DefaultRowHeaderDataProvider(
                        bodyDataProvider)), bodyLayerStack.getViewportLayer(),
                bodyLayerStack.getSelectionLayer());

        // create the corner layer stack
        ILayer cornerLayer = new CornerLayer(new DataLayer(
                new DefaultCornerDataProvider(columnHeaderDataProvider,
                        rowHeaderDataProvider)), rowHeaderLayer,
                columnHeaderLayer);

        // create the grid layer composed with the prior created layer stacks
        GridLayer gridLayer = new GridLayer(bodyLayerStack, columnHeaderLayer,
                rowHeaderLayer, cornerLayer);

        final NatTable natTable = new NatTable(gridPanel, gridLayer, false);
        natTable.setConfigRegistry(configRegistry);
        natTable.addConfiguration(new DefaultNatTableStyleConfiguration());
        natTable.addConfiguration(new HeaderMenuConfiguration(natTable));
        natTable.addConfiguration(new SingleClickSortConfiguration());
        natTable.configure();
        GridDataFactory.fillDefaults().grab(true, true).applyTo(natTable);

        Button addColumnButton = new Button(buttonPanel, SWT.PUSH);
        addColumnButton.setText("列の追加");
        addColumnButton.addSelectionListener(new SelectionAdapter() {
            @Override
            public void widgetSelected(SelectionEvent e) {
                String newColumn = "Column_" + columns.size();
                columns.add(newColumn);

                for (Map<String, String> value : values) {
                    String prefix = value.get("Column_0");
                    prefix = prefix.substring(0, prefix.indexOf("_"));
                    value.put(newColumn, prefix + "_" + (columns.size() - 1));
                }

                bodyDataLayer.fireLayerEvent(new ColumnInsertEvent(
                        bodyDataLayer, columns.size() - 1));
            }
        });

        return panel;
    }

    private Map<String, String> createValueRow(String value) {
        Map<String, String> valueRow = new HashMap<String, String>();

        for (int i = 0; i < columns.size(); i++) {
            String column = columns.get(i);
            valueRow.put(column, value + "_" + i);
        }

        return valueRow;
    }

    class MyColumnPropertyAccessor implements
            IColumnPropertyAccessor<Map<String, String>> {

        @Override
        public Object getDataValue(Map<String, String> rowObject,
                int columnIndex) {
            return rowObject.get(getColumnProperty(columnIndex));
        }

        @Override
        public void setDataValue(Map<String, String> rowObject,
                int columnIndex, Object newValue) {
            rowObject.put(getColumnProperty(columnIndex), newValue.toString());
        }

        @Override
        public int getColumnCount() {
            return columns.size();
        }

        @Override
        public String getColumnProperty(int columnIndex) {
            return columns.get(columnIndex);
        }

        @Override
        public int getColumnIndex(String propertyName) {
            return columns.indexOf(propertyName);
        }
    }

    class SimpleColumnHeaderDataProvider implements IDataProvider {

        @Override
        public Object getDataValue(int columnIndex, int rowIndex) {
            return "Column " + (columnIndex + 1); //$NON-NLS-1$
        }

        @Override
        public void setDataValue(int columnIndex, int rowIndex, Object newValue) {
            throw new UnsupportedOperationException();
        }

        @Override
        public int getColumnCount() {
            return columns.size();
        }

        @Override
        public int getRowCount() {
            return 1;
        }
    }
}

最後はインスタンスを実行する部分です。

List: StandaloneRunner.java
/*******************************************************************************
 * Copyright (c) 2012 Original authors and others.
 * All rights reserved. This program and the accompanying materials
 * are made available under the terms of the Eclipse Public License v1.0
 * which accompanies this distribution, and is available at
 * http://www.eclipse.org/legal/epl-v10.html
 * 
 * Contributors:
 *     Original authors and others - initial API and implementation
 ******************************************************************************/
// Original File is StandaloneNatExampleRunner.java in NatTableExamples.jar
// modified by Suguri Fuhito, 15-Aug-2014
package sample;

import org.eclipse.swt.SWT;
import org.eclipse.swt.layout.FillLayout;
import org.eclipse.swt.widgets.Control;
import org.eclipse.swt.widgets.Display;
import org.eclipse.swt.widgets.Shell;

public class StandaloneRunner {

    public static void run(ISampleApp obj) {
        run(800, 800, obj);
    }

    public static void run(int width, int height, ISampleApp obj) {
        // Setup
        Display display = Display.getDefault();
        Shell shell = new Shell(display, SWT.SHELL_TRIM);
        shell.setLayout(new FillLayout());
        shell.setSize(width, height);
        shell.setText(obj.getName());

        // Create example control
        Control instanceControl = obj.createNatTableControl(shell);

        // Start
        obj.onStart();

        shell.open();

        while (!shell.isDisposed()) {
            if (!display.readAndDispatch()) {
                display.sleep();
            }
        }

        // Stop
        obj.onStop();

        instanceControl.dispose();

        shell.dispose();
        display.dispose();
    }
}

実行例

引用サイト

  1. Overview (parent 1.1.0-SNAPSHOT API)
  2. NatTable - Download
  3. Lang - Download Apache Commons Lang
    • NatTable のライブラリが一部の処理で commons-lang を使用しています。最新のではなく、common-lang 2.x で動作しました。


2014-08-14

SWT による GUI プログラミング (6) - NatTable のサンプル

JFace に数日間取り組んで、なんとなく使い方が判ってきたので、興味の対象であった Nebula Project の NatTable を使ってみようとしましたが、雲をつかむようで使い始める切り口をつかめません。そこで まずは、NatTable のサイトで公開されているサンプルを実行してみる事にしました。

用意するもの

NatTable のサンプルを実行するには、Java の実行環境に加えて、下記 1. のサンプルファイルと、2. のサンプルを実行するプラットフォームに対応した SWT ライブラリが必要になります。自分のプラットフォームでは、swt-4.4-gtk-linux-x86_64.zip をダウンロードしました。

  1. NatTableExamples-1.1.0.jar
  2. プラットフォームに対応した SWT ライブラリ

サンプルの実行(CentOS 7 の場合)

ダウンロードした SWT ライブラリについては、適当な場所に ZIP ファイルを展開して、SWT.jar を NatTable のサンプル NatTableExamples-1.1.0.jar と同じディレクトリへコピーしておきます。端末エミュレータ上で前述の 2 つのファイルが保存されているディレクトリに移動し、以下のようにタイプしてサンプルを起動します。

$ java -cp swt.jar:NatTableExamples.jar org.eclipse.nebula.widgets.nattable.examples.NatTableExamples

注)パスの区切りは Linux の bash では : (コロン)ですが Windows などでは ; (セミコロン)かもしれません。未確認です、すみません。

実行例

NatTable に目を付けた時の印象(期待する機能)とはズレていないことを確認できましたが、サンプルをいくら眺めても使えるようにはならないので、サンプルのコードを読み始めています。

NatTable の使い途

NatTable を何に使いたいかというと、それは、遅々として開発が進まない Ammonite に実装して、大量のデータを扱えるようにしたいと考えているのです。Ammonite は、エンジニアリングで必要な統計解析をなんでも簡単にできるツールにしたいのですが、昨年、ちょっとブログで紹介しただけでちっとも進んでいないプロジェクトです。

誰に期待されているわけでもないのですが、こうやってひとたびブログに話題を出してしまって、あとで何も進捗していないことを振り返り自己嫌悪に陥ることしばしばです。それでも懲りずに中途半端を繰り返してしまうのですが…。

JavaFX の TableView を使いこなせない者が NatTable を使いこなせるのか?という謗りを受けそうですが、たぶんその通りでしょう。しかし、基本機能として重要となるスプレッドシート状の GUI 部品である、大変魅力的な NatTable を前にして、入れ物だけはさっさと JavaFX から SWT/JFace へ移し替えてしまっています。そこそこ使いこなせるようになるまで、いや、納得できるまでじっくり取り組むことにします。

NatTable とは何か?

本来であれば、最初に NatTable とは何かを説明すべきなのですが、十分に使いこなせない段階で説明をしようとすると、不備が出てしまいそうでなかなかできません。YouTube で NatTable の解説を見つけたので掲載します[資料]。

2014-08-12

SWT による GUI プログラミング (5) - JFace

JFace は、Wikipadia の説明を借りれば、SWT の上層に位置し、一般的な UI プログラミングタスクを制御するクラスを提供するライブラリです。SWT に Model View Controller の視点を持ち込んだものと言える、とのことですが、これはおいおいサンプルで理解していくことにします。

SWT の基本的なウィジェットのサンプルについては、しばらく更新をサボっているホームページにもっと網羅的にまとめる予定です。ブログではそろそろ JFace の話題に移りたいと思います。

JFace を利用する際のプロジェクトのビルドパス設定 (Eclipse)

JFace を利用するには、SWT のライブラリの他に、Eclipse 本体にあるライブラリを利用します。

SWT ライブラリを利用したアプリケーション開発では、SWT ライブラリをプロジェクトとしてワークスペースにインポートしておき、それを右のようにプロジェクトのビルドパスに加えて利用していました。

JFace を利用する際は、この設定に加えて下記のライブラリをビルドパスに加ます。<version info> の部分は、それぞれのライブラリのバージョン番号です。

  • org.eclipse.core.commands_<version info>.jar
  • org.eclipse.equinox.common_<version info>.jar
  • org.eclipse.jface_<version info>.jar
  • org.eclipse.osgi_<version info>.jar
  • org.eclipse.ui.workbench_<version info>.jar

プロジェクトのビルドパスの設定画面で、(バージョン番号には違いがあるかもしれませんが)ライブラリが以下のようになっていれば OK です。

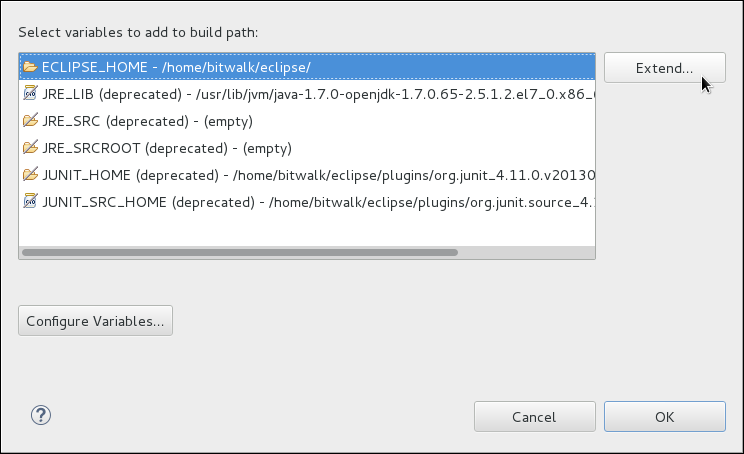
これは、ライブラリの設定タブの画面で 「Add Variable ...」ボタンをクリックして、環境変数一覧が表示されたウィンドウを開き、 ECLIPSE_HOME を選択して「Extend...」ボタンをクリックして、この環境変数が差すディレクトリの中から、ライブラリ(jar ファイル)を選択します。

上述のライブラリは、全て plugins ディレクトリ内に格納されています。

JFace 版 Hello World!

bitWalk's: SWT による GUI プログラミング (2) で紹介した SWT の Label クラスのサンプル SWTAppLabel.java を JFace 用に書き直しました。

List: JFaceApp.java
package applicationwindow;

import org.eclipse.jface.window.ApplicationWindow;
import org.eclipse.swt.SWT;
import org.eclipse.swt.graphics.Color;
import org.eclipse.swt.layout.GridLayout;
import org.eclipse.swt.widgets.Composite;
import org.eclipse.swt.widgets.Control;
import org.eclipse.swt.widgets.Display;
import org.eclipse.swt.widgets.Label;

public class JFaceApp extends ApplicationWindow {
    public JFaceApp() {
        super(null);
    }

    @Override
    protected Control createContents(Composite parent) {
        Composite container = new Composite(parent, SWT.NONE);
        container.setBackground(new Color(null, 220, 220, 255));
        GridLayout gl = new GridLayout(1, true);
        gl.marginBottom = 2;
        gl.marginTop = 2;
        gl.marginLeft = 10;
        gl.marginRight = 10;
        container.setLayout(gl);
        
        Label lab = new Label(container, SWT.CENTER);
        lab.setText("こんにちは、世界!");
        lab.setBackground(new Color(null, 200, 200, 255));
        return container;
    }

    public static void main(String[] args) {
        ApplicationWindow w = new JFaceApp();
        w.setBlockOnOpen(true);
        w.open();
        Display.getCurrent().dispose();
    }
}

JFace の流儀に従って、ApplicationWindow クラスを継承したフレームワークによってウィンドウを作成していますが、SWT のウィジェットやレイアウト・マネージャをそのまま使っています。

実行例

ブログで紹介する単純なサンプルを用意する前に、具体的に機能するサンプルをいくつか作ってみて、試行錯誤をしながら理解を深めていきたいので、本トピックの続きを掲載するのには、少し間が空いてしまうかもしれません。

参考サイト

  1. JFace - Eclipsepedia

2014-08-11

SWT による GUI プログラミング (4)

SWT, Standard Widget Toolkit を利用した基本的なサンプルを紹介します。今回は List と Table クラスのウィジェットです。

List

List クラスのインスタンスはリスト(一次元のデータ列)を表示するウィジェットです。

List: SWTAppList.java
package list;

import org.eclipse.swt.SWT;
import org.eclipse.swt.events.SelectionAdapter;
import org.eclipse.swt.events.SelectionEvent;
import org.eclipse.swt.layout.FillLayout;
import org.eclipse.swt.widgets.Button;
import org.eclipse.swt.widgets.Display;
import org.eclipse.swt.widgets.List;
import org.eclipse.swt.widgets.Shell;

public class SWTAppList {
    Shell shell;
    String[] prefData = { "北海道", "青森県", "岩手県", "宮城県", "秋田県", "山形県", "福島県",
            "茨城県", "栃木県", "群馬県", "埼玉県", "千葉県", "東京都", "神奈川県", "山梨県", "長野県",
            "新潟県", "富山県", "石川県", "福井県", "岐阜県", "静岡県", "愛知県", "三重県", "滋賀県",
            "京都府", "大阪府", "兵庫県", "奈良県", "和歌山県", "鳥取県", "島根県", "岡山県", "広島県",
            "山口県", "徳島県", "香川県", "愛媛県", "高知県", "福岡県", "佐賀県", "長崎県", "熊本県",
            "大分県", "宮崎県", "鹿児島県", "沖縄県" };

    public SWTAppList(Display display) {
        shell = new Shell(display);
        shell.setText("List");

        initUI();

        // shell.pack();
        shell.setSize(100, 200);
        shell.setLocation(100, 100);
        shell.open();

        while (!shell.isDisposed()) {
            if (!display.readAndDispatch()) {
                display.sleep();
            }
        }

    }

    public void initUI() {
        shell.setLayout(new FillLayout());

        List list = new List(shell, SWT.SINGLE | SWT.BORDER | SWT.V_SCROLL);
        for (String prefName : prefData) {
            list.add(prefName);
        }
        list.addSelectionListener(new SelectionAdapter() {
            @Override
            public void widgetSelected(SelectionEvent e) {
                List l = (List) e.widget;
                int idx = l.getSelectionIndex();
                if (idx > -1) {
                    System.out.println(l.getItem(idx) + "がクリックされました。");
                }
            }
        });

        list.pack();
    }

    public static void main(String[] args) {
        Display display = new Display();
        new SWTAppList(display);
        display.dispose();
    }
}

実行例

List: コンソール上の出力
北海道がクリックされました。
東京都がクリックされました。

Table

Table および関連クラスのインスタンスは、二次元のテーブルにテキストやイメージのリストを(行単位で)表示するウィジェットです。

List: SWTAppTable.java
package table;

import org.eclipse.swt.SWT;
import org.eclipse.swt.layout.FillLayout;
import org.eclipse.swt.widgets.Display;
import org.eclipse.swt.widgets.Shell;
import org.eclipse.swt.widgets.Table;
import org.eclipse.swt.widgets.TableColumn;
import org.eclipse.swt.widgets.TableItem;

public class SWTAppTable {
    Shell shell;
    String[] colNames = { "チーム", "試合数", "勝数", "負数", "引分数", "勝率" };
    String[][] rowData = { { "ソフトバンク", "24", "18", "4", "2", "0.818" },
            { "オリックス", "24", "15", "7", "2", "0.682" },
            { "日本ハム", "24", "16", "8", "0", "0.667" },
            { "中日", "24", "14", "10", "0", "0.583" },
            { "西武", "24", "12", "11", "1", "0.522" },
            { "ヤクルト", "24", "10", "12", "2", "0.455" },
            { "巨人", "24", "10", "13", "1", "0.435" },
            { "阪神", "24", "10", "14", "0", "0.417" },
            { "楽天", "24", "9", "13", "2", "0.409" },
            { "ロッテ", "24", "8", "14", "2", "0.364" },
            { "横浜", "24", "7", "13", "4", "0.35" },
            { "広島", "24", "6", "16", "2", "0.273" } };

    public SWTAppTable(Display display) {
        shell = new Shell(display);
        shell.setText("Table");

        initUI();

        shell.pack();
        shell.setLocation(100, 100);
        shell.open();

        while (!shell.isDisposed()) {
            if (!display.readAndDispatch()) {
                display.sleep();
            }
        }
    }

    public void initUI() {
        shell.setLayout(new FillLayout());

        Table table = new Table(shell, SWT.MULTI | SWT.FULL_SELECTION
                | SWT.BORDER);

        table.setHeaderVisible(true);
        table.setLinesVisible(true);

        for (int i = 0; i < colNames.length; i++) {
            int colAlign, colWidth;

            if (i == 0) {
                colAlign = SWT.LEFT;
                colWidth = 150;
            } else {
                colAlign = SWT.RIGHT;
                colWidth = 100;
            }
            TableColumn col = new TableColumn(table, colAlign);
            col.setText(colNames[i]);
            col.setWidth(colWidth);
        }

        for (String[] data : rowData) {
            TableItem item = new TableItem(table, SWT.NULL);
            item.setText(data);
        }

        table.pack();
    }

    public static void main(String[] args) {
        Display display = new Display();
        new SWTAppTable(display);
        display.dispose();
    }

}

実行例

参考サイト

  1. Help - Eclipse Platform
  2. Java SWT tutorial
  3. FrontPage - SWTサンプル集

2014-08-10

SWT による GUI プログラミング (3)

SWT, Standard Widget Toolkit を利用した基本的なサンプルを紹介します。今回は Menu, Toolbar クラスのウィジェットです。

Menu

Menu および関連クラスのインスタンスはプルダウンメニューのメニューバーです。

List: SWTAppMenu.java
package menu;

import org.eclipse.swt.SWT;
import org.eclipse.swt.events.SelectionAdapter;
import org.eclipse.swt.events.SelectionEvent;
import org.eclipse.swt.widgets.Display;
import org.eclipse.swt.widgets.FileDialog;
import org.eclipse.swt.widgets.Menu;
import org.eclipse.swt.widgets.MenuItem;
import org.eclipse.swt.widgets.Shell;

public class SWTAppMenu {
    Shell shell;

    public SWTAppMenu(Display display) {
        shell = new Shell(display);
        shell.setText("Menu");

        initUI();

        shell.setSize(300, 200);
        shell.setLocation(100, 100);
        shell.open();

        while (!shell.isDisposed()) {
            if (!display.readAndDispatch()) {
                display.sleep();
            }
        }
    }

    public void initUI() {
        Menu menuBar = new Menu(shell, SWT.BAR);
        shell.setMenuBar(menuBar);

        MenuItem cascadeFileMenu = new MenuItem(menuBar, SWT.CASCADE);
        cascadeFileMenu.setText("ファイル");
        Menu fileMenu = new Menu(shell, SWT.DROP_DOWN);
        cascadeFileMenu.setMenu(fileMenu);

        MenuItem newItem = new MenuItem(fileMenu, SWT.PUSH);
        newItem.setText("新規ファイル");

        MenuItem openItem = new MenuItem(fileMenu, SWT.PUSH);
        openItem.setText("ファイルを開く");
        openItem.addSelectionListener(new SelectionAdapter() {
            @Override
            public void widgetSelected(SelectionEvent e) {
                String[] filters = new String[] { "Java sources",
                        "All Files (*)" };
                String[] extensions = new String[] { "*.java", "*" };

                FileDialog dialog = new FileDialog(shell, SWT.OPEN);
                dialog.setFilterNames(filters);
                dialog.setFilterExtensions(extensions);

                String path = dialog.open();
                if (path != null) {
                    System.out.println(path + "が選択されました。");
                }
            }
        });

        new MenuItem(fileMenu, SWT.SEPARATOR);
        
        MenuItem exitItem = new MenuItem(fileMenu, SWT.PUSH);
        exitItem.setText("アプリケーションの終了");
        exitItem.addSelectionListener(new SelectionAdapter() {
            @Override
            public void widgetSelected(SelectionEvent e) {
                shell.getDisplay().dispose();
                System.exit(0);
            }
        });
    }

    public static void main(String[] args) {
        Display display = new Display();
        new SWTAppMenu(display);
        display.dispose();
    }
}

実行例

Toolbar

Toolbar および関連クラスのインスタンスはプルダウンメニューの代わりにアイコンイメージなどのボタンでコマンドメニュー群を構成する場合に利用します。

List: SWTAppToolbar.java
package toolbar;

import org.eclipse.swt.SWT;
import org.eclipse.swt.events.SelectionAdapter;
import org.eclipse.swt.events.SelectionEvent;
import org.eclipse.swt.graphics.Device;
import org.eclipse.swt.graphics.Image;
import org.eclipse.swt.widgets.Display;
import org.eclipse.swt.widgets.FileDialog;
import org.eclipse.swt.widgets.Shell;
import org.eclipse.swt.widgets.ToolBar;
import org.eclipse.swt.widgets.ToolItem;

public class SWTAppToolbar {
    private Shell shell;
    private Image newImage;
    private Image openImage;
    private Image exitImage;

    public SWTAppToolbar(Display display) {
        shell = new Shell(display);
        shell.setText("Toolbar");

        initUI();

        shell.setSize(300, 200);
        shell.setLocation(100, 100);
        shell.open();

        while (!shell.isDisposed()) {
            if (!display.readAndDispatch()) {
                display.sleep();
            }
        }
    }

    public void initUI() {
        Device dev = shell.getDisplay();
        try {
            newImage = new Image(dev, "image/document-new.png");
            openImage = new Image(dev, "image/document-open.png");
            exitImage = new Image(dev, "image/application-exit.png");
        } catch (Exception e) {
            System.out.println("Cannot load images");
            System.out.println(e.getMessage());
            System.exit(1);
        }

        ToolBar toolBar = new ToolBar(shell, SWT.BORDER);

        ToolItem newItem = new ToolItem(toolBar, SWT.PUSH);
        newItem.setImage(newImage);
        newItem.setToolTipText("新規ファイル");

        ToolItem openItem = new ToolItem(toolBar, SWT.PUSH);
        openItem.setImage(openImage);
        openItem.setToolTipText("ファイルを開く");
        openItem.addSelectionListener(new SelectionAdapter() {
            @Override
            public void widgetSelected(SelectionEvent e) {
                String[] filters = new String[] { "Java sources",
                        "All Files (*)" };
                String[] extensions = new String[] { "*.java", "*" };

                FileDialog dialog = new FileDialog(shell, SWT.OPEN);
                dialog.setFilterNames(filters);
                dialog.setFilterExtensions(extensions);

                String path = dialog.open();
                if (path != null) {
                    System.out.println(path + "が選択されました。");
                }
            }
        });

        new ToolItem(toolBar, SWT.SEPARATOR);

        ToolItem exitItem = new ToolItem(toolBar, SWT.PUSH);
        exitItem.setImage(exitImage);
        exitItem.setToolTipText("アプリケーションの終了");
        exitItem.addSelectionListener(new SelectionAdapter() {
            @Override
            public void widgetSelected(SelectionEvent e) {
                shell.getDisplay().dispose();
                System.exit(0);
            }
        });
        toolBar.pack();
    }

    public static void main(String[] args) {
        Display display = new Display();
        new SWTAppToolbar(display);
        display.dispose();
    }
}

このサンプルでは、終了時にイメージの廃棄処理をしていませんので、メモリに残ってしまいます。ImageRegistry を利用した例を、JFace のサンプルで説明する予定です。

実行例

参考サイト

  1. Help - Eclipse Platform
  2. Java SWT tutorial
  3. FrontPage - SWTサンプル集

2014-08-09

SWT による GUI プログラミング (2)

SWT, Standard Widget Toolkit を利用した基本的なサンプルを紹介します。今回は Shell, Label, Button クラスのウィジェットです。

Shell

Shell クラスのインスタンスはトップレベルのウィンドウです。

List: SWTAppShell.java
package shell;

import org.eclipse.swt.widgets.Display;
import org.eclipse.swt.widgets.Shell;

public class SWTAppShell {
    Shell shell;

    public SWTAppShell(Display display) {
        shell = new Shell(display);
        shell.setText("Shell");

        shell.setSize(200, 200);
        shell.setLocation(100, 100);
        shell.open();

        while (!shell.isDisposed()) {
            if (!display.readAndDispatch()) {
                display.sleep();
            }
        }
    }

    public static void main(String[] args) {
        Display display = new Display();
        new SWTAppShell(display);
        display.dispose();
    }
}

実行例

SWT のアプリケーションでは、まず Display クラスのインスタンスを作成します。 このインスタンスは、SWT のアプリケーションと、下部で動作している OS とを結び付けています。

Shell クラスのインスタンスは、トップレベルのウィンドウを生成しています。

SWT のアプリケーションでは下記のようにイベントループの処理を明確に記述する必要があります。

while (!shell.isDisposed()) {
    if (!display.readAndDispatch()) {
        display.sleep();
    }
}

Shell クラスのインスタンス shell が、ウィンドウが閉じられるなどの処理がされるまでループが継続されます。このループは、アプリケーションが終了された時にリソースを開放する display.dispose(); の処理の前に定型句のように記述しておく必要があります。

Label

Label クラスのインスタンスは 文字や画像、あるいはセパレータを表示します。

List: SWTAppLabel.java
package label;

import org.eclipse.swt.SWT;
import org.eclipse.swt.graphics.Color;
import org.eclipse.swt.layout.GridLayout;
import org.eclipse.swt.widgets.Display;
import org.eclipse.swt.widgets.Label;
import org.eclipse.swt.widgets.Shell;

public class SWTAppLabel {
    Shell shell;

    public SWTAppLabel(Display display) {
        shell = new Shell(display);
        shell.setText("Label");

        initUI();

        shell.setLocation(100, 100);
        shell.open();

        while (!shell.isDisposed()) {
            if (!display.readAndDispatch()) {
                display.sleep();
            }
        }
    }

    public void initUI() {
        shell.setBackground(new Color(null, 220, 220, 255));

        GridLayout gl = new GridLayout(1, true);
        gl.marginBottom = 2;
        gl.marginTop = 2;
        gl.marginLeft = 10;
        gl.marginRight = 10;
        shell.setLayout(gl);

        Label lab = new Label(shell, SWT.CENTER);
        lab.setText("こんにちは、世界!");
        lab.setBackground(new Color(null, 200, 200, 255));

        shell.pack();
    }

    public static void main(String[] args) {
        Display display = new Display();
        new SWTAppLabel(display);
        display.dispose();
    }
}

実行例

Button

Button クラスのインスタンスは プッシュボタン、チェックボタン、ラジオボタンなど複数の種類のボタンとして利用できます。

List: SWTAppButton.java
package button;

import org.eclipse.swt.SWT;
import org.eclipse.swt.events.SelectionAdapter;
import org.eclipse.swt.events.SelectionEvent;
import org.eclipse.swt.graphics.Color;
import org.eclipse.swt.layout.GridData;
import org.eclipse.swt.layout.GridLayout;
import org.eclipse.swt.layout.RowLayout;
import org.eclipse.swt.widgets.Button;
import org.eclipse.swt.widgets.Display;
import org.eclipse.swt.widgets.Group;
import org.eclipse.swt.widgets.Shell;

public class SWTAppButton {

    Shell shell;

    public SWTAppButton(Display display) {
        shell = new Shell(display);
        shell.setText("Button");

        initUI();

        shell.pack();
        shell.setLocation(100, 100);
        shell.open();

        while (!shell.isDisposed()) {
            if (!display.readAndDispatch()) {
                display.sleep();
            }
        }
    }

    public void initUI() {
        shell.setBackground(new Color(null, 220, 255, 255));

        GridLayout gl = new GridLayout(1, true);
        gl.marginBottom = 2;
        gl.marginTop = 2;
        gl.marginLeft = 4;
        gl.marginRight = 4;
        shell.setLayout(gl);

        GridData gd = new GridData(SWT.FILL, SWT.FILL, false, false);

        // プッシュボタン
        Button but = new Button(shell, SWT.PUSH);
        but.setText("プッシュボタン");
        but.setLayoutData(gd);
        but.addSelectionListener(new SelectionAdapter() {
            @Override
            public void widgetSelected(SelectionEvent e) {
                Button b = (Button) e.widget;
                System.out.println(b.getText() + "がクリックされました。");
            }
        });

        // 矢印ボタン
        Button arw = new Button(shell, SWT.ARROW | SWT.DOWN);
        arw.setLayoutData(gd);
        arw.addSelectionListener(new SelectionAdapter() {
            @Override
            public void widgetSelected(SelectionEvent e) {
                System.out.println("矢印ボタンがクリックされました。");
            }
        });

        // チェックボタン
        Button chk = new Button(shell, SWT.CHECK);
        chk.setText("チェックボタン");
        chk.setLayoutData(gd);
        chk.addSelectionListener(toggleSelectionAdapter);

        // ラジオボタン
        Group rbgroup = new Group(shell, SWT.SHADOW_IN);
        rbgroup.setText("グループ");
        rbgroup.setLayout(new RowLayout(SWT.VERTICAL));

        Button rb1 = new Button(rbgroup, SWT.RADIO);
        rb1.setText("ラジオボタンA");
        rb1.addSelectionListener(radioSelectionAdapter);

        Button rb2 = new Button(rbgroup, SWT.RADIO);
        rb2.setText("ラジオボタンB");
        rb2.addSelectionListener(radioSelectionAdapter);

        Button rb3 = new Button(rbgroup, SWT.RADIO);
        rb3.setText("ラジオボタンC");
        rb3.addSelectionListener(radioSelectionAdapter);

        rb1.setSelection(true);

        // トグルボタン
        Button tgl = new Button(shell, SWT.TOGGLE);
        tgl.setText("トグルボタン");
        tgl.setLayoutData(gd);
        tgl.addSelectionListener(toggleSelectionAdapter);
    }

    private SelectionAdapter radioSelectionAdapter = new SelectionAdapter() {
        @Override
        public void widgetSelected(SelectionEvent e) {
            Button b = (Button) e.widget;

            if (b.getSelection()) {
                System.out.println(b.getText() + "が選択されました。");
            }
        }
    };

    private SelectionAdapter toggleSelectionAdapter = new SelectionAdapter() {
        @Override
        public void widgetSelected(SelectionEvent e) {
            Button b = (Button) e.widget;

            if (b.getSelection()) {
                System.out.println(b.getText() + "がオンになりました。");
            } else {
                System.out.println(b.getText() + "オフになりました。");
            }
        }
    };

    public static void main(String[] args) {
        Display display = new Display();
        new SWTAppButton(display);
        display.dispose();
    }
}

実行例

List: コンソール上の出力
プッシュボタンがクリックされました。
矢印ボタンがクリックされました。
チェックボタンがオンになりました。
ラジオボタンBが選択されました。
トグルボタンがオンになりました。

参考サイト

  1. Help - Eclipse Platform
  2. Java SWT tutorial
  3. FrontPage - SWTサンプル集

2014-08-08

SWT による GUI プログラミング

SWT, Standard Widget Toolkit は、Java プラットフォーム用ウィジェット・ツールキットの一種で、各種プラットフォームのネイティブウィジェットにアクセスできる共通な API を提供することを目的とするライブラリです。すなわち SWT はプラットフォーム固有の GUI ライブラリへのラッパーであるため、複数のプラットフォーム対応としてアプリケーションを配布する際には、プラットフォーム毎の SWT(JARファイル)が必要になります。また、SWT は AWT と同様に、手動でオブジェクトの解放をする必要があります。

Java の GUI ライブラリについては、JavaFX 2 に注目しているものの、SWT のウィジェットである Nebula / NatTable をどうしても使ってみたくなり、まずは SWT ライブラリをある程度使えるようにするべく情報収集を始めました。

Eclipse のインストール

CentOS 7 を使うようになって、開発環境はとりあえず NetBeans IDE を使おうとインストールしたばかりなのですが、SWT を習得するには、SWT を利用している Eclipse を使った方が、なにかと情報も得やすいだろうと考え、結局 Eclipse もダウンロードして使えるようにしました (Eclipse 4.4)。と言っても、ダウンロードした圧縮ファイルを展開しただけです。

$ tar xvf ダウンロード/eclipse-standard-luna-R-linux-gtk-x86_64.tar.gz
eclipse/
eclipse/.eclipseproduct
eclipse/about_files/
eclipse/about_files/mpl-v20.txt
eclipse/about_files/IJG_README
(以下、省略)
...

したがって、Eclipse のメッセージは日本語では表示されません。

自分が使っている CentOS 7 は「開発およびクリエイティブワークステーション」としてインストールされていますので、java-1.7.0-openjdk および関連パッケージがインストールされているため、何か追加でインストールすることなく Eclipse を起動できました。

ちなみに、私は、表示アイコンとして eclipse.png と、以下のようなファイルを $HOME/デスクトップ 内に用意して、デスクトップにアイコンを表示しています。

List: Eclipse.desktop
#!/usr/bin/env xdg-open
[Desktop Entry]
Version=1.0
Type=Application
Name=Eclipse
Comment=
Exec=/home/bitwalk/eclipse/eclipse
Icon=/home/bitwalk/share/icons/eclipse.png
Path=
Terminal=false
StartupNotify=false

自分が使っている CentOS 7 では、デスクトップ環境に「GNOME クラシック」を使っています。PC が古く、今どきのデスクトップ環境を存分に利用するにはやや非力なので、もっと軽量なデスクトップを使いたいとは思うものの、頻繁に利用するアプリケーションのアイコンをデスクトップ上に表示できさえすれば、これでも結構満足できてしまいます。

SWT ライブラリのダウンロード

SWT は前述したように、プラットフォームに依存した GUI ライブラリであるため、SWT を利用したアプリケーションを開発するには、まず、開発環境が動作するプラットフォーム用の SWT ライブラリをダウンロードしておく必要があります。下記のサイトからプラットフォームにあった SWT のライブラリをダウンロードします。

私の環境では、Linux (x86_64/GTK+)の swt-4.4-gtk-linux-x86_64.zip をダウンロードします。

次に、Eclipse を起動して、メニューから FileImport... を選択して、ダウンロードした SWT ライブラリを、プロジェクトとしてワークスペースにインポートします。

以上で SWT ライブラリを Eclipse で利用するための準備は終わりです。プロジェクトの生成時に、今回インポートした org.eclipse.swt へパスを通せば、SWT ライブラリが利用できます。

動作確認

SWT ライブラリが利用できることを確認するために、古い記事ですが、下記のサイトで紹介されているサンプルを試してみました。

Java のプロジェクトを生成する際に、先程インポートした org.eclipse.swt へパスを通しておきます。

上記記事で紹介されていたサンプルをコピーしてクラス名を調整します。

コンパイルして実行したサンプルに、適当な CSV ファイルを読み込ませてみた例です。

SWT ライブラリを利用したアプリケーションの動作が確認できましたので、しばらくは、(今更ではありますが)基本的なウィジェットのサンプルを備忘録がわりに紹介していきたいと思います。とりあえずサンプルの解説は後回しにして、サンプルコードと実行例だけ掲載していきます。

下記は Windows の例ですが、丁寧に説明されています。